Do you want to finish your quilt with a nice and clean look? We have prepared an article on how to bind a quilt with mitered corners to help you!
Binding creates a clean and finished look to your quilt. Aside from covering the raw edges, it also holds the layers of the quilt together.
There are lots of ways to bind a quilt, but for this article, we’ll focus on quilt binding with mitered corners. Any idea what’s a mitered corner?
What Are Mitered Corners?
Mitered corners are the corners that meet at a 45-degree angle. In fact, you might have seen this in windows or in picture frames.
Similarly, you can also use mitered corners in quilting. This creates a flat and tidy finish when you’re binding your quilt.
Mitered corners work look best when the binding fabric you use has patterns, especially stripes. If done correctly, your stripes will line up perfectly!
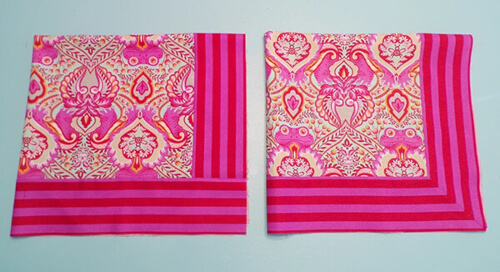
Mitered Corners vs Non-Mitered Corners by Quilted Works
How to Bind a Quilt with Mitered Corners
Now that we have an idea of how mitered corners look like, it’s time to make them!
1. Preparing your Quilt for Binding
To prepare your quilt for binding, first, you have to add a basting stitch around the quilt. Basting the entire perimeter of the quilt helps hold together the layers of the quilt and secures the quilting lines.
In addition to that, it also makes binding easier since you’re sure the layers won’t shift even when moving the quilt. With the layers safely held together, removing the excess batting and backing fabric won’t be a hassle.
A cutting mat and a rotary cutter can help you easily cut the excess fabric. You can also use a serger machine to square the quilt and finish the quilt edges.
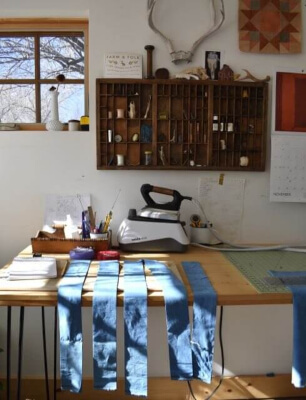
Prepare the Binding Strips by Farmandfolk
2. Preparing the Binding Strip
Compute the Binding Length
Since we’ll be using one long binding strip, or a continuous binding strip, for the whole quilt, we have to compute for its binding length. Having enough or more than the binding length will make it easier to join the ends together.
To compute for the binding length:
- Get the sum of all the sides: 70 + 60 + 70 + 60 = 240
- Divide the sum by the Width of Fabric (WOF). For cotton fabrics, the WOF is usually 42 inches. For this example, we’ll assume that the WOF is 40 inches: 240 / 40 = 6.5
- To ensure you have enough fabric, round the number up to a whole number (6.5 to 7). If your number is almost close to a whole number and add another strip just to be sure you’ll have enough. (6.8 to 8)
- Choose your desired binding strip width and multiply it by the number of strips. 7 x 2.25 = 15.75
- Round up the number to the nearest ⅛ yard: 18 inches or ½ yard
To have more than enough fabric to bind your 60 x 70 inches fabric, you’ll need half a yard of fabric that you’ll cut into 7 strips with 2.25 inches width.
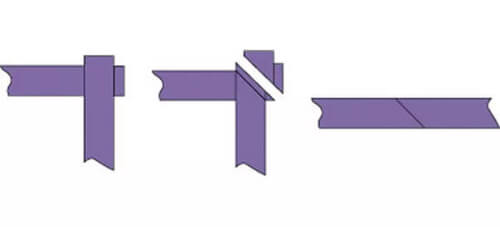
Joining Binding Strip by SpruceCrafts
Join the Binding Strips to Make a Continuous Strip
After you have prepared your strips, it’s time to sew them together to create a continuous strip! You can check out the diagram above to learn how to join the strips diagonally with seam allowances.
Diagonal seams are preferred when creating the binding strip since they reduce the bulk along the edges.
3. Making Mitered Corners
Is your continuous binding strip ready? It’s time to attach your binding strip to your quilt!
- Start by aligning the raw side of your binding strip to the raw side of the quilt. You can use pins or wonder clips to keep them in place.
- Begin sewing your binding to the back of the quilt. Choose one side and start in the middle of it. Make sure to leave 10 inches allowance, this will be used in joining the ends of the binding strip.
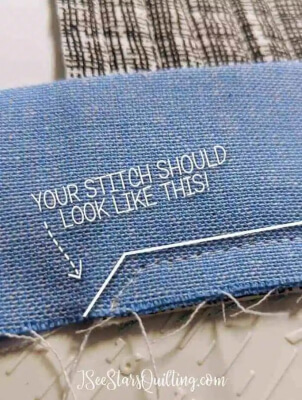
- Stop sewing when you’re ¼ inches away from the edge of the quilt. Then rotate your quilt 45 degrees.
Rotate 45 degrees and continue sewing up to the corner to make the Mitered Corner by Iseestarsquilting
- The corner of your quilt should be pointing towards you. Sew straight until you reach the corner of your quilt.
- Remove your quilt from the machine and flip the binding strip up along the 45-degree line you just have sewn. Then fold the strip over itself, make sure the fold at the top is aligned with the edge of the quilt.
- Make sure the binding strip is aligned with the edge of the quilt and start sewing starting from the edge of the quilt.
- Repeat all these steps until you have sewn all four corners of your quilt
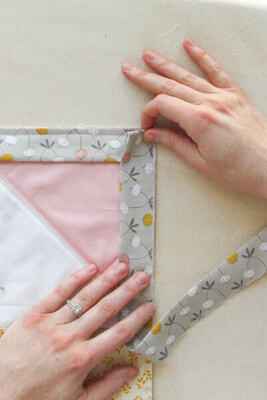
Fold the Mitered Corner Binding Strip Over Itself by Villageboundquilts
4. Joining the Edges of your Binding Strip
Now that you have sewn all four mitered corners, it’s time to join the ends of your binding strip. Make sure you have a minimum of 6 inches gap between where you started sewing the binding and where you ended sewing it.
- Fold back the bindings and leave a ¼ inches gap in between.
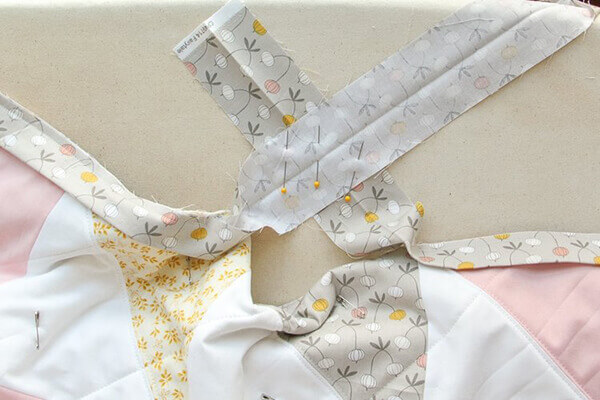
- Mark the intersecting crease on the inside (on one of the ends of the strip) and on the outside (for the other end of the strip).Twist it 90 degrees, making an X shape with the excess binding strips and pin it. To further understand, you may refer to the image below.
Join the Both Ends of the Strip by Villageboundquilts
- Sew a straight line through the center to join the two ends. Leave ¼ inch seam allowance before cutting the rest of the tail.
- Now you have joined the edges of your binding strip! Align the raw edge of the strip to the raw edge of the quilt.
- Finish attaching the rest of the binding to your quilt.
Finishing the Reverse Side of Your Quilt
We’re almost done! After attaching the binding strip to the backside of your quilt, it’s time to work on the front side. Flip your quilt and fold the binding around the edges.
After that, make sure you fixed all the mitered corners before sewing all the sides. To bind in place, you can use pins or wonder clips.
Start sewing around the edges using your sewing machine, or you can also do it manually by hand.
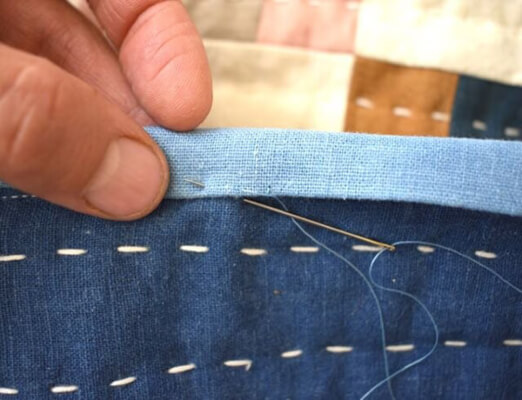
Finish the quilt by hand sewing the binding to the front of the quilt by Farmandfolk
Easy Mitered Corners Quilt Binding
And that’s it! You have finally finished binding a quilt with mitered corners. It’s not as hard as it looks, isn’t it? Itching to try this process on another quilt?
For more quilting tutorials, check out our How to Sandwich a Quilt Perfectly and Free Trip Around the World Quilt Pattern.
If you want to practice your binding and quilting skills, start with our Bow Tie Quilt Patterns. After you’re done, share your work on our Facebook Page!
We love seeing the works of everyone in the community. We hope this article about how to bind a quilt with mitered corners helped you add a cleaner finish to your quilts!

