Zippers are not only functional components they are also fashionable design elements. If you have a zipper that is giving you trouble, there might be a way to fix it. Knowing how to fix a zipper is something that everyone could benefit from.
When a zipper breaks, most people throw the item away. This is a waste of money. These items can often be fixed with just a little bit of knowledge and time. And most fixes do not cost anything.

If you are having zipper trouble check out our tips below on how to fix a broken zipper.
Before learning on how to fix a zipper, first let’s know the different parts of a zipper.
Different Parts of a Zipper

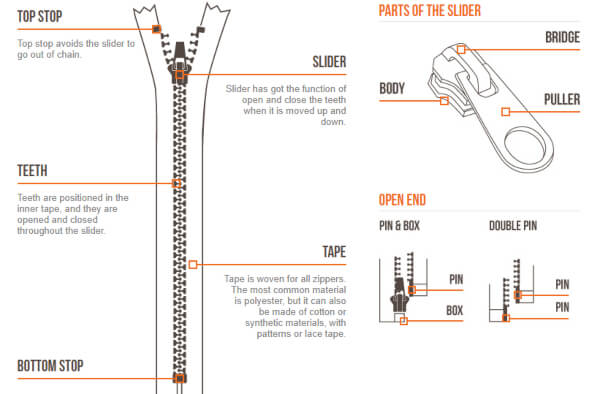
A zipper is comprised of several different parts; they are:
- Teeth
The teeth are also referred to as elements. They are the parts of the zipper that engage with each other and keep your zipper closed. Zipper teeth are often made from metal or plastic.
- Slider
The slider consists of the pull, bridge and slider. It is the component that you slide up and down to zip and unzip the teeth.
- Tape
Zipper tape is the woven fabric that the teeth are on. It is often made from polyester or cotton. It is what attaches the zipper to the fabric of the object.
- Top Stop
The top stop keeps the zipper slider from pulling off the top of the zipper. It is often made from metal or plastic.
- Bottom Stop
The bottom stop keeps the zipper slider from coming off the bottom of the zipper. It is often made from metal or plastic.
Ways on how to fix a zipper

1. How to fix a separated zipper
If your zipper separates when you pull the zipper pull, the pull is often the problem. Over time, the slider can wear out or be damaged.
You will need:
- Needle nose pliers
- Possibly a new zipper slider
- Remove the stopper, using the needle nose pliers, from the side of the zipper that has the zipper slider attached.
- Remove the zipper slider.
- Inspect the zipper slider for damage. If it is distorted, use the pliers to squeeze it back into its original shape. If the pull is too damaged, it will need to be replaced.
- Put the zipper slider back onto the zipper teeth.
- Replace the stopper with help from the pliers. The stopper made to be reinforced with some thread. If the stopper is damaged and cannot be replaced. Create your own stopper with some heavy duty thread and a needle.
2. Fixing a Stuck Zipper
There are many reasons your zipper can get stuck. But the most common reason is due to stuck fabric.
You will need:
- Needle nose pliers
- Do not continue to pull on the zipper. This will make it worse and can damage the zipper teeth. Instead, stop immediately.
- If you can get a good hold on the fabric, gently pull it out of the zipper pull. If you are unable to grab the fabric with your fingers, use needle nose pliers. As you are removing the fabric, gently slide the zipper pull so that the fabric is released.
- Straighten the zipper teeth so the zipper pull slides smoothly along the zipper. If the teeth are damaged, the zipper may never align correctly.
3. The Zipper Pull Broke Off the Slider
When the zipper puller breaks off the body of the zipper pull, it can be almost impossible to zip or unzip the zipper. A quick fix it to thread a paper clip through the bridge and use it as the puller. At least this way, you can remove the garment or open your bag. You cannot just replace the zipper puller. You will need to replace the whole slider.
You will need:
- Needle nose pliers
- A new slider
- Remove the stopper, using the needle nose pliers, from the side of the zipper that has the zipper slider attached.
- Remove the old zipper slider.
- Replace the old zipper slider with the new slider.
- Replace the stopper using the needle nose pliers. If the stopper does not want to stay in place, reinforce it with some thread. If the stopper is damaged, create a stopper with some heavy duty thread and a needle.
4. Zipper Slider Came Off One Side of the Zipper Teeth
The zipper slider can get distorted and come off one side of the zipper.
You will need:
- Needle nose pliers
- Possibly a new slider
- First, inspect the zipper to make sure there is not any damage the teeth.
- If the zipper looks fine, the issue is probably due to an issue with the slider. Inspect the slider to determine if there is any major damage.
- If no major damage is present, use the needle nose pliers to very gently widen the side of the slider that came off the zipper.
- Starting at the bottom of the zipper put the track back in the slider. This helps to ensure that the tracks are aligned.
- Slide the slider to ensure it glides smoothly and the teeth are aligned. If it does not, repeat step 4.
- Pinch the side of the slider slightly so it will not fall off again. Do not pinch it too tightly.
5. Zipper Teeth are Hard to Close
Continuous use can cause the teeth of the zipper to wear out. Teeth cannot be replaced, but you can make your zipper last a little bit longer with the help of a lubricant. No matter what you use, do not use so much that it clogs the teeth.
You can use:
- Petroleum jelly
- Candle wax
- WD-40
- Chapstick
- Crayon
- Pencil graphite
- Soap
- Olive oil

How to fix a zipper is quick and easy to learn.
This is a common problem that can be embarrassing. Unfortunately, this issue cannot be fixed. The only way to take care of this problem is to replace the zipper completely.
At some point in time, you will have to deal with a broken or stuck zipper. Before you throw out your favourite pair of jeans, handbag or coat, try these proven tips. The fix is usually quick and easy. Knowing how to fix a zipper will save you time, money and hassle.
Hope you enjoyed our tips on how to fix a zipper! For more crafting tutorials, see our How to Hang a Picture with a Wire, How to Fix a Broken Metal Bracelet and How to Make a String Bracelet.


